What's new

Ryko CMD

Thomas Miller

Banned
Joined
Feb 23, 2023
Messages
38
Reaction score
18
Points
8
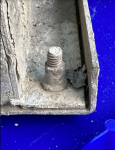
Hello everyone! This is my first post on this forum and I recently over the past few weeks have been attempting to restore a 1st Generation Ryko CMD with the Floodlights. I have already run into my first issue, which is I can't get into the back of the CMD to access the motherboard, due to the back cover being secured with bolts and what look like "rivet nuts" These rivet nuts are tough to get off, not only to mention they're also inside the CMD as well holding the cover in place. My first and only goal is to get this CMD running, but first by doing that I need some wiring schematics because there are 2 wires, one for the floodlights, and one for the Custom Message Display board. Anything helps.
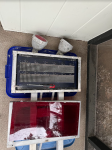
cmd.png rivnut.png
 

Ryko CS

Active member
Joined
Apr 23, 2012
Messages
359
Reaction score
93
Points
28
Location
Grimes, Ia
For the bolts securing the back panel to the CMD weldment, I would recommend using a cutoff wheel on a grinder to pop the heads off. Once those are loose, the back should come off, and you will probably need to grind the flanges off too to get the rivet nuts to pop out. You can try TriFlow, but that doesn't always release them.

For the wiring, this is going to be a little different for each model machine, so it depends on what you are wired to. You should have one cable with 6 conductors and those will be your 24VAC signal wires going to the terminals 0, 2, 4, 8, 16 inside the unit along with wire 25 as the neutral. For an older Softgloss with FX2N PLC, it should be wired like this:
1677190565265.png


For the stop/go lights, those will be 120VAC coming from a relay onboard the machine through the other cable. On an older Softgloss, it's likely wired as shown below. The K69 is a relay in the panel.

1677190448496.png
 

Thomas Miller

Banned
Joined
Feb 23, 2023
Messages
38
Reaction score
18
Points
8
For the bolts securing the back panel to the CMD weldment, I would recommend using a cutoff wheel on a grinder to pop the heads off. Once those are loose, the back should come off, and you will probably need to grind the flanges off too to get the rivet nuts to pop out. You can try TriFlow, but that doesn't always release them.

For the wiring, this is going to be a little different for each model machine, so it depends on what you are wired to. You should have one cable with 6 conductors and those will be your 24VAC signal wires going to the terminals 0, 2, 4, 8, 16 inside the unit along with wire 25 as the neutral. For an older Softgloss with FX2N PLC, it should be wired like this:
View attachment 7846


For the stop/go lights, those will be 120VAC coming from a relay onboard the machine through the other cable. On an older Softgloss, it's likely wired as shown below. The K69 is a relay in the panel.

View attachment 7845
This was formerly on an UltraSonic 2001 Rollover machine. I was also wondering if the Signage Display takes 120 volts to power it? Unfortunately it also seems that the Rivet Nuts are inside the back frame, so I may just have to cutoff the bolt heads and replace the bolts.
 
Last edited:

soapy

Senior Member
Joined
Sep 1, 2007
Messages
2,894
Reaction score
855
Points
113
Location
Rocky Mountains
Rivnuts corrode and won't come loose in a wet environment. Put anti seize on the bolt when putting them in will help alot. I buy reusable plastic push pin rivets to replace the Rivnuts after I bring them out. Rocky mountain ATV sells them in 10 packs and work in the existing hole once the Rivnuts are removed.
 

Thomas Miller

Banned
Joined
Feb 23, 2023
Messages
38
Reaction score
18
Points
8
Rivnuts corrode and won't come loose in a wet environment. Put anti seize on the bolt when putting them in will help alot. I buy reusable plastic push pin rivets to replace the Rivnuts after I bring them out. Rocky mountain ATV sells them in 10 packs and work in the existing hole once the Rivnuts are removed.
You have a 1st gen CMD at your wash? How do you get the ones on the inside of the frame out?
 

Ryko CS

Active member
Joined
Apr 23, 2012
Messages
359
Reaction score
93
Points
28
Location
Grimes, Ia
You have a 1st gen CMD at your wash? How do you get the ones on the inside of the frame out?
After you get the bolt head off, the cover should be able to come loose. Once that's out of the way, just grind the flange of the rivet nut off too, then use a punch to knock it loose.
 

Ryko CS

Active member
Joined
Apr 23, 2012
Messages
359
Reaction score
93
Points
28
Location
Grimes, Ia
This was formerly on an UltraSonic 2001 Rollover machine. I was also wondering if the Signage Display takes 120 volts to power it? Unfortunately it also seems that the Rivet Nuts are inside the back frame, so I may just have to cutoff the bolt heads and replace the bolts.
On the older US2001 gantry machines, here are the outputs that would have driven the CMD sign:
1677503091410.png
126 would be your 25VAC hot, and 25 would be your neutral.

There would be 120VAC going to the CMD sign using wires 99 (hot), and 90 (neutral).

The green/red lights would also be 120VAC, and those are the ones indicated as "offboard" in the circuit below:
1677503268328.png
 

Thomas Miller

Banned
Joined
Feb 23, 2023
Messages
38
Reaction score
18
Points
8
On the older US2001 gantry machines, here are the outputs that would have driven the CMD sign:
View attachment 7868
126 would be your 25VAC hot, and 25 would be your neutral.

There would be 120VAC going to the CMD sign using wires 99 (hot), and 90 (neutral).

The green/red lights would also be 120VAC, and those are the ones indicated as "offboard" in the circuit below:
View attachment 7869
I finally managed to open it, located wires 99 and 90, and wired them up to a 3-wire grounding plug (99 to hot and 90 to neutral). However, after plugging everything in, the test button didn't work and there was no RYKO MFG CO message either. I used a multimeter and found out that the CMD Board was getting 9.75VAC after the transformer. I tried to troubleshoot by adjusting some settings, but still no luck. I did not put any voltage through the Binary Bit wires though, as I just wanted to see if I could even get it to light up. It would really suck if it's broken, regardless I'm going to restore it cosmetically.
 
Last edited:

Ryko CS

Active member
Joined
Apr 23, 2012
Messages
359
Reaction score
93
Points
28
Location
Grimes, Ia
If you have 120VAC going into the transformer, the output of that transformer should be 8VAC, and that connects to the terminals in the lower right corner of the sign. With power applied, it should come up with Ryko MFG, then try to display message 0 by default. Pressing the test switch on the left side of the board (when looking at it from the back) should just illuminate all the individual LED's on the board.
 

Thomas Miller

Banned
Joined
Feb 23, 2023
Messages
38
Reaction score
18
Points
8
If you have 120VAC going into the transformer, the output of that transformer should be 8VAC, and that connects to the terminals in the lower right corner of the sign. With power applied, it should come up with Ryko MFG, then try to display message 0 by default. Pressing the test switch on the left side of the board (when looking at it from the back) should just illuminate all the individual LED's on the board.
That’s what I did, nothing came up even when pressing the test button. I don’t know if it’s getting too much voltage from the 9.75VAC but otherwise I’m gonna assume a fried board. Let me tell you this thing is pretty much bomb proof, I had to drill through 6 screws and cut off an entire metal beam. Later today I’m going to cut off the other beam and JB Weld modified beams to hold the LED Board, the new beams should also make it easier to remove the LED Board for service.
 

Attachments

Last edited:

Ryko CS

Active member
Joined
Apr 23, 2012
Messages
359
Reaction score
93
Points
28
Location
Grimes, Ia
It's possible the transformer is providing too much voltage. It's pretty standard that most electronic components should work + = 10%, so that would put it on the edge. That LED light should also illuminate if you press that test switch.
 

Thomas Miller

Banned
Joined
Feb 23, 2023
Messages
38
Reaction score
18
Points
8
It's possible the transformer is providing too much voltage. It's pretty standard that most electronic components should work + = 10%, so that would put it on the edge. That LED light should also illuminate if you press that test switch.
No LED on the Motherboard was lighting up either, it didn't either when I hit the test switch. Maybe I'll buy a new transformer, and if that doesn't work looks like I'm needing a new board.
 

Thomas Miller

Banned
Joined
Feb 23, 2023
Messages
38
Reaction score
18
Points
8
How much would a new Motherboard cost, and are they still even made? I'm looking for a Revision B Board, but any revision will still work I believe.
 

Ryko CS

Active member
Joined
Apr 23, 2012
Messages
359
Reaction score
93
Points
28
Location
Grimes, Ia
The 16367-003 boards are still available. The current revision is rev E. I don't have the pricing, but our parts team can help you with that. Their # is 800-283-7956.
 

Thomas Miller

Banned
Joined
Feb 23, 2023
Messages
38
Reaction score
18
Points
8
The 16367-003 boards are still available. The current revision is rev E. I don't have the pricing, but our parts team can help you with that. Their # is 800-283-7956.
I'll give them a call, I got both floodlights working, but I had to replace both bulbs as they were toast.
 

Thomas Miller

Banned
Joined
Feb 23, 2023
Messages
38
Reaction score
18
Points
8
The 16367-003 boards are still available. The current revision is rev E. I don't have the pricing, but our parts team can help you with that. Their # is 800-283-7956.
It was a freaking fuse… can’t believe I forgot to check that.
 

CMDguy

Member
Joined
Jan 13, 2023
Messages
46
Reaction score
6
Points
8
Location
Grimes, Iowa
Nice getting yourself a 1st gen! @Ryko CS I also have a CMD from circa 2001, the wash it came from is actually down the road from your factory! They were scrapping the thing so I contacted the owners and I was able to save it!
 

Ryko CS

Active member
Joined
Apr 23, 2012
Messages
359
Reaction score
93
Points
28
Location
Grimes, Ia
Nice getting yourself a 1st gen! @Ryko CS I also have a CMD from circa 2001, the wash it came from is actually down the road from your factory! They were scrapping the thing so I contacted the owners and I was able to save it!
😅 Those old boards are hard to find!

Thomas, can't believe it was a fuse, or that we both overlooked it. First rule in troubleshooting is KISS. Keep it simple!
 

Thomas Miller

Banned
Joined
Feb 23, 2023
Messages
38
Reaction score
18
Points
8
😅 Those old boards are hard to find!

Thomas, can't believe it was a fuse, or that we both overlooked it. First rule in troubleshooting is KISS. Keep it simple!
Absolutely! Now that everything is working, I took it all apart yesterday and deep-cleaned it. Today is priming and repainting.
 

CMDguy

Member
Joined
Jan 13, 2023
Messages
46
Reaction score
6
Points
8
Location
Grimes, Iowa
Absolutely! Now that everything is working, I took it all apart yesterday and deep-cleaned it. Today is priming and repainting.
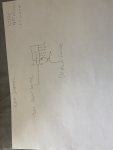
I made a schematic on how I control my CMD and I hope it gives you a better understanding on how everything is connected together. IMG_3597.png
 
Top