What's new

CryptoPay Button Issue

gshick

New member
Joined
Feb 26, 2018
Messages
26
Reaction score
3
Points
3
Location
Richmond, Va
Hello. We have around 60 CryptoPay swipers in count up mode at 6 SS locations. The swipers are anywhere from 4 to 5 years old and several buttons have started to go bad, is anyone else having this issue? Has anyone attempted to replace the button? CryptoPay tech support basically said we are on our own. Thanks.
 

OurTown

Well-known member
Joined
Nov 8, 2017
Messages
3,653
Reaction score
1,413
Points
113
Location
Ohio
Are you saying that they won't replace the buttons anymore or they won't help with any info on you replacing the buttons? Yes I have replaced about 10 of them so far. You will need E-Switch PV6H240SS-331 buttons, 24 gauge stranded wire, T-8 Torx bit and clear 100% silicone caulk. It is a tedious job but not that bad.

1. Remove the four Torx head screws from the back of the swiper
2. break the seal on the back plate and the wires going through it
3. remove the two screws holding the board to the main body
4. take a few closeup photos to show where the button wires go into the board terminals
5. to release the wires you need something really thin to depress the spring in the slot above the wire hole
6. using needle nose pliers unscrew the nut holding the button to the main body
7. push the button out the front of the body
8. cut four lengths of wire (2"?) and strip both ends and solder the wires onto the four terminals of the new switch
9. silicone caulk the button where the o-ring seal is, push into body and screw in the retaining nut (reuse the nut from the old one because it has the ground off corners to fit)
10. push wires into the correct terminals on the board (two are for the switch and two are the green LED halo)
11. carefully push the wires into the button recess and install the board (this was the most tedious part for me because the wires wanted to pull out or keep the board from installing flush)
12. Caulk the back plate and where the wires go through the hole.

This is probably overly detailed but that's the way I roll. There are red halo LED versions of the buttons and we thought about using those instead of the green for using them in count up mode. It makes more sense for a stop button.
 

OurTown

Well-known member
Joined
Nov 8, 2017
Messages
3,653
Reaction score
1,413
Points
113
Location
Ohio
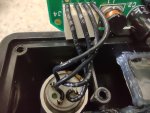
This is a photo I took before I disconnected the wires.

IMG_20220428_145000650_HDR.jpg
 

gshick

New member
Joined
Feb 26, 2018
Messages
26
Reaction score
3
Points
3
Location
Richmond, Va
Are you saying that they won't replace the buttons anymore or they won't help with any info on you replacing the buttons? Yes I have replaced about 10 of them so far. You will need E-Switch PV6H240SS-331 buttons, 24 gauge stranded wire, T-8 Torx bit and clear 100% silicone caulk. It is a tedious job but not that bad.

1. Remove the four Torx head screws from the back of the swiper
2. break the seal on the back plate and the wires going through it
3. remove the two screws holding the board to the main body
4. take a few closeup photos to show where the button wires go into the board terminals
5. to release the wires you need something really thin to depress the spring in the slot above the wire hole
6. using needle nose pliers unscrew the nut holding the button to the main body
7. push the button out the front of the body
8. cut four lengths of wire (2"?) and strip both ends and solder the wires onto the four terminals of the new switch
9. silicone caulk the button where the o-ring seal is, push into body and screw in the retaining nut (reuse the nut from the old one because it has the ground off corners to fit)
10. push wires into the correct terminals on the board (two are for the switch and two are the green LED halo)
11. carefully push the wires into the button recess and install the board (this was the most tedious part for me because the wires wanted to pull out or keep the board from installing flush)
12. Caulk the back plate and where the wires go through the hole.

This is probably overly detailed but that's the way I roll. There are red halo LED versions of the buttons and we thought about using those instead of the green for using them in count up mode. It makes more sense for a stop button.
Thank you for the information. CryptoPay said they will not repair any swiper with a serial number less than 16,000. Did you order the buttons through Digikey? Also, are the red lighted buttons the exact same just a different color?
 

gshick

New member
Joined
Feb 26, 2018
Messages
26
Reaction score
3
Points
3
Location
Richmond, Va
Are you saying that they won't replace the buttons anymore or they won't help with any info on you replacing the buttons? Yes I have replaced about 10 of them so far. You will need E-Switch PV6H240SS-331 buttons, 24 gauge stranded wire, T-8 Torx bit and clear 100% silicone caulk. It is a tedious job but not that bad.

1. Remove the four Torx head screws from the back of the swiper
2. break the seal on the back plate and the wires going through it
3. remove the two screws holding the board to the main body
4. take a few closeup photos to show where the button wires go into the board terminals
5. to release the wires you need something really thin to depress the spring in the slot above the wire hole
6. using needle nose pliers unscrew the nut holding the button to the main body
7. push the button out the front of the body
8. cut four lengths of wire (2"?) and strip both ends and solder the wires onto the four terminals of the new switch
9. silicone caulk the button where the o-ring seal is, push into body and screw in the retaining nut (reuse the nut from the old one because it has the ground off corners to fit)
10. push wires into the correct terminals on the board (two are for the switch and two are the green LED halo)
11. carefully push the wires into the button recess and install the board (this was the most tedious part for me because the wires wanted to pull out or keep the board from installing flush)
12. Caulk the back plate and where the wires go through the hole.

This is probably overly detailed but that's the way I roll. There are red halo LED versions of the buttons and we thought about using those instead of the green for using them in count up mode. It makes more sense for a stop button.
Also, have you ever attempted to reuse the wires and just resolder them to the new button?
 

OurTown

Well-known member
Joined
Nov 8, 2017
Messages
3,653
Reaction score
1,413
Points
113
Location
Ohio
Thank you for the information. CryptoPay said they will not repair any swiper with a serial number less than 16,000. Did you order the buttons through Digikey? Also, are the red lighted buttons the exact same just a different color?

If I remember correctly the red LED halo was a different voltage but I'm not sure that matters. I think there was someone on here that used the red ones or was going to. I think I did buy them from Digi-Key. Make sure your swipers have the larger button because the older ones had the smaller button. (I think it was 12mm)
 

OurTown

Well-known member
Joined
Nov 8, 2017
Messages
3,653
Reaction score
1,413
Points
113
Location
Ohio
Also, have you ever attempted to reuse the wires and just resolder them to the new button?

I did not try that. My thought was to have all the soldering done beforehand so the buttons were ready to install.
 
Top