What's new
Car Wash Forum

This is a sample guest message. Register a free account today to become a member! Once signed in, you'll be able to participate on this site by adding your own topics and posts, as well as connect with other members through your own private inbox!

Replacing CryptoPay buttons - how?

Mchas

Active member
After being frustrated by the fact that CryptoPay won’t repair swipers more than a few years old and after reading on here that changing the buttons is fairly easy, I thought I would give it a try. My first problem was that the screws holding the back cover on were so rusty I had to drill them out. Next problem was that I couldn’t lift the circuit board out. Realized it was because the button was soldered directly to the board. Removed the solder and managed to get the board out but now it seems like the replacement buttons I got aren’t the same as the original ones since the tabs are in a different orientation. How did you guys replace them? I could add some wire between the new button and the board but then I still have the problem of the new button being shorter. The old button was held in place by the board sitting on top of it at just the right height so it didn’t need to be screwed to the case. The new buttons have a nut but the case is too narrow for them to fit.

At this point I don’t really care about ruining this particular swiper but I would like to figure out how to do it for next time. Attached is a picture of the board and the old and new buttons

Any advice? Thanks!
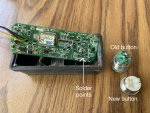

E5CCA5F0-954D-4D7A-8CAF-C0B7C2F44F37.jpeg
 
After looking at your old button I bet they were made by Bulgin and not E-Switch. I bought some larger illuminated anti-vandal Bulgin switches for a JE Adams combo vac that have a very similar lug pattern. I'm betting they make one that fits that so you could re-solder them in the same way.
 
I bet this was one of the earliest swipers they made. The serial number is in the low 4 digits. This particular one seems to have some water damage anyway so it’s probably not worth repairing. I was just curious how to do it. Sounds like the newer ones will be easier now that I have the buttons on hand.
 
Could you get in there with a Dremel bit and grind out enough room for the nut? That will let you use the shorter button by extending it with wires.
 
Could you get in there with a Dremel bit and grind out enough room for the nut? That will let you use the shorter button by extending it with wires.

I thought about it but since this swiper is probably 8+ years old and the circuit board has some water damaged I think it’s probably not worth the trouble.
 
I wouldn't waste my time on that one. Look at the water damage and corrosion on the board, if you did replace the switch it's not long for this world.
 
After being frustrated by the fact that CryptoPay won’t repair swipers more than a few years old My first problem was that the screws holding the back cover on were so rusty I had to drill them out.

Any advice? Thanks!

Interesting ... did they ever start using stainless steel for the mounting screws etc?
 
I wonder why the electronic equipment suppliers don't coat there boards with a conformal coating. it must be the cost.

Randy & others,

We just installed two Maytag 75 lbs dryers ... plug n play dollar coin acceptors are on their way. To the point ... I had a lengthy conversation with Imonex "BUTCH" (An International Company located in Texas). One of the things during the conversation that came up was electronics car wash waterproofing. He said that they do that ... but to address ... like you say possible cost ... the water issue ... there is an extra charge. Maybe our friends at CryptoPay could do "the extra charge approach" for their electronic readers ... to help ... with CryptoPay's durability-longevity???!!!
 
After being frustrated by the fact that CryptoPay won’t repair swipers more than a few years old and after reading on here that changing the buttons is fairly easy, I thought I would give it a try. My first problem was that the screws holding the back cover on were so rusty I had to drill them out. Next problem was that I couldn’t lift the circuit board out. Realized it was because the button was soldered directly to the board. Removed the solder and managed to get the board out but now it seems like the replacement buttons I got aren’t the same as the original ones since the tabs are in a different orientation. How did you guys replace them? I could add some wire between the new button and the board but then I still have the problem of the new button being shorter. The old button was held in place by the board sitting on top of it at just the right height so it didn’t need to be screwed to the case. The new buttons have a nut but the case is too narrow for them to fit.

At this point I don’t really care about ruining this particular swiper but I would like to figure out how to do it for next time. Attached is a picture of the board and the old and new buttons

Any advice? Thanks!


View attachment 3938
After all the time and effort, would it be wiser to just buy a new one? :)
 
After all the time and effort, would it be wiser to just buy a new one? :)

New ones are $400+ tax. If I can buy a button for under $15 and repair it myself in less than 15 minutes it’s well worth it. I was mainly using this one as practice since it is very old and I didn’t care if I ruined it.
 
Back
Top