What's new

Roof Trough for bay hoses

Rudy

Active member
Joined
Sep 5, 2007
Messages
721
Reaction score
110
Points
43
Location
Pennsylvania
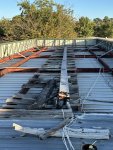
The roof trough that holds the hoses for the bays needs to be replaced. The original trough was made from galvanized sheet metal....the type that's used for ductwork in houses. After 25 years, it's finally rusted past the point of repair.

Any suggestions what to use to make a new trough?
 

soonermajic

Well-known member
Joined
Oct 26, 2014
Messages
3,387
Reaction score
871
Points
113
Location
texas
PVC w/ some holes drilled in it.
Or spray paint hoses white. Will keep em MUCH cooler in Summer
 

Randy

Well-known member
Joined
Sep 5, 2007
Messages
5,883
Reaction score
2,260
Points
113
Since the galvanized sheet metal trough lasted 25 years why not replace it with another galvanized sheet metal trough. But then on the other hand how many more years do you plan on staying in the car wash business, it might make more sense to build a trough out of plywood if you plan on existing within the next couple of years or whatever is the least expensive.
 

Earl Weiss

Well-known member
Joined
Aug 31, 2007
Messages
6,390
Reaction score
949
Points
113
If trough needs to be insulated an HVAC Contractor can probably make one and you can use ridged insulation for top, Sides and bottom. Paint or undercoating type covering may prolong life. Plywood - Painted might last a log time. Perhaps cover with roofing material.
 

MEP001

Well-known member
Joined
Aug 30, 2007
Messages
16,665
Reaction score
3,948
Points
113
Location
Texas
It would be expensive, but signboard plywood would hold up well, no need to paint it. At least it won't rust.

Coleman washes have galvanized troughs on the roof made from a much heavier metal than ductwork.
 

cantbreak80

Maybe I need new clubs
Joined
Feb 10, 2008
Messages
1,131
Reaction score
585
Points
113
Location
CO
We use a local “residential duct supplier” to fab our troughs.

22ga galvanized steel, bent to form an “L”.

8-1/2” wide x 5-1/2” high x 1” lip x 10’ long.

2 ”L“s create the trough and provides swing room for wrenches.


We glue 3/4” polyiso to insulate…and heat cable to keep it warm.
The Dewalt track saw makes quick work of cutting the polyiso.😁

View attachment 4343 View attachment 4341 View attachment 4342 View attachment 4344
 

Rudy

Active member
Joined
Sep 5, 2007
Messages
721
Reaction score
110
Points
43
Location
Pennsylvania
Thanks for the pics. That looks like a great setup.

I'll get some bids on the metal work.

BTW....how did you glue the insulation to the metal?
 

cantbreak80

Maybe I need new clubs
Joined
Feb 10, 2008
Messages
1,131
Reaction score
585
Points
113
Location
CO
Degrease the sheet metal. Most sheet metal rolls have a thin film of oil from the factory…and dirt from the brake.

To prevent chemical melting of the poly-iso, use foamboard adhesive like: Loctite PL300

We use a Milwaukee Caulking Gun because our hands cramp badly trying to manually apply the thick adhesive…and the application goes twice as fast.

Allow the adhesive to cure by carefully stacking each section. Carefully, so the fresh adhesive doesn’t allow slippy-slide of the foam board…that’s a PIA to resolve on the jobsite.
 

marinemail05

New member
Joined
May 31, 2024
Messages
5
Reaction score
0
Points
1
Degrease the sheet metal. Most sheet metal rolls have a thin film of oil from the factory…and dirt from the brake.

To prevent chemical melting of the poly-iso, use foamboard adhesive like: Loctite PL300

We use a Milwaukee Caulking Gun because our hands cramp badly trying to manually apply the thick adhesive…and the application goes twice as fast.

Allow the adhesive to cure by carefully stacking each section. Carefully, so the fresh adhesive doesn’t allow slippy-slide of the foam board…that’s a PIA to resolve on the jobsite.
Is that just pvc to get into the bay?
 

soapy

Senior Member
Joined
Sep 1, 2007
Messages
2,899
Reaction score
857
Points
113
Location
Rocky Mountains
I use large 6 to 8 inch PVC pipe with a electrical box above each bay that I can open for servicing. No rust in 30 years.
 

marinemail05

New member
Joined
May 31, 2024
Messages
5
Reaction score
0
Points
1
I use large 6 to 8 inch PVC pipe with a electrical box above each bay that I can open for servicing. No rust in 30 years.
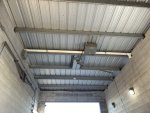
Happen to have any pictures? My trough is about 8” above the ceiling so I need something to fill the gap from the trough to the bay ceiling. IMG_5850.jpeg
 

soapy

Senior Member
Joined
Sep 1, 2007
Messages
2,899
Reaction score
857
Points
113
Location
Rocky Mountains
This location has PVC that run on both sides of the roof purlin with each servicing 2 bays. IMG_4460.JPG
 

Rfreeman

Well-known member
Joined
Aug 4, 2014
Messages
761
Reaction score
440
Points
63
Location
Ft. Worth
Happen to have any pictures? My trough is about 8” above the ceiling so I need something to fill the gap from the trough to the bay ceiling. View attachment 12061

If I was you I would add expanded metal and possibly reinforcement beams from purlin to purlin. that would make a nice deck to set a trough on and work on any repairs. Be sure to prime it and paint it so that it will hold up against the weather.
 

marinemail05

New member
Joined
May 31, 2024
Messages
5
Reaction score
0
Points
1
yep that’s what I’m doing. I have new troughs as well. What I was trying to figure out was the best way to transition from the trough into the ceiling.
 

marinemail05

New member
Joined
May 31, 2024
Messages
5
Reaction score
0
Points
1
I used toilet flanges from HD. Since you have 8" I would extend the flange with some pvc pipe
Good idea. What are you doing to prevent leaks up top? Just caulking around the hole in the roof? Thank you for the pics.
 

Rfreeman

Well-known member
Joined
Aug 4, 2014
Messages
761
Reaction score
440
Points
63
Location
Ft. Worth
Good idea. What are you doing to prevent leaks up top? Just caulking around the hole in the roof? Thank you for the pics.

Well my install was a little easier bc my trough is sitting on top of the r panel secured with L brackets I made. So in the "valleys" of the r panel where I put the flange i sealed the trough with weather stripping tape forming an L from the outside of the trough to the roof if that makes sense. So water doesn't run in those channels to the down spout and into the bay
 

Rudy

Active member
Joined
Sep 5, 2007
Messages
721
Reaction score
110
Points
43
Location
Pennsylvania
When I replaced my trough several years ago, I followed the advice of someone on this forum.

Make your trough "L" shaped instead of "U" shaped. One side of the "L" stays affixed to the roof, the other "L" is the lid. The two "L's" join to make a box.

Man, what a difference. When you need to throw some wrenches inside the trough....you have room to maneuver. Removing the top "L" allows access to the front side.

If it's "U" shaped, it's impossible to have the same amount of access.
 
Top